Wednesday, October 31, 2012

Where ya been? Whatcha been doin?

I'll probably never be one of those highly successful bloggers with thousands of followers. I should have known when I started this blog back in the beginning of this year that I would have a hard time sustaining a steady blogging or crafting schedule. I don't know how you people do it--posting every day, or even every other day, or even once or twice a week, which now seems completely daunting to me!

Much like my pool playing, I'm not always a consistent crafter. I tend to craft in spurts. I'll get a jag to do some sewing and then spend a few weeks sewing all kinds of crafty goodness.

Or I'll get a full head 'o steam about paint projects and start to paint anything that's not tied down.

Then, I'll suddenly drop painting and start decoupaging and then everybody gets decoupaged presents for Christmas that year.

But then, just as easily, I'll spend weeks not doing anything the least bit crafty or DIY in nature.

That's just how I roll.

And so it goes with the blog too. I've been as consistent with blogging as I have been with my pool playing. Maybe I'm not the compulsive type.

That being said, although I haven't been blogging a whole lot, I have been busy making jewelry in preparation for three craft shows the next three Saturdays. I'm hoping that you, my trusty followers, will appreciate that sometimes, rather than constantly writing about what we're doing, we have to spend time actually just doing so that we'll have something to write about later.

So I've been working up new jewelry designs using vintage buttons, shell buttons, vintage brooches and other pieces of old costume jewelry. I've also been using various wire-wrapping techniques.

I'm having so much fun with the button jewelry pieces particularly. They have that vintage shabby chic somethin-somethin' goin on, dontcha think?
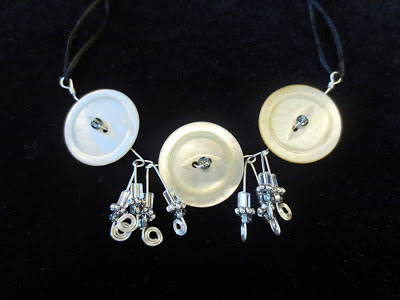
Vintage mother-of-pearl buttons wired together with glass crystal-studded wires and strung on black silk.

Vintage mother-of-pearl buttons combined with vintage crystals and strung on organza ribbon.

Green glass teardrops wrapped in gold-tone copper wire

I call this "crystal chaos" -- little tiny crystals amidst a chaos of wire and a champagne glass pearl

A vintage costume brooch is the focal point of an asymmetrical necklace with smokey grey glass pearls and crackle ceramic beads.

Vintage chandelier crystal dangles from multi-colored glass pearls strung on organza ribbon

My love of the spiral design continues with these simple wire earrings.

More wire wrapped around Czech glass crystals

Pink-coated copper wire wrapped around rose quarts stones.
Thanks for taking a look.

If you LIKE Crazy Thrifty Crafts on Facebook, then you can keep up to date on my Craft Fair schedule, in case you desperately need to purchase some of my  jewelry.

Thanks!

I'm trick-or-treating at the following houses:

Savvy Southern Style Wow Us Wednesday
Shabby Creek Cottage Transformation Thursday
PRIMP Primp Your Stuff Wednesday
Made In a Day Made You Look Linky
Full Circle Creations All Star Block Party
The Shabby Nest Frugal Friday
My Repurposed Life Catch As Catch Can
504 Main Tickled Pink
Kammy's Korner Trash 2 Treasure Tuesday


Sunday, October 7, 2012

Shut the front door!

It's suddenly kinda cold around here.

So I figured I'd boil up some sugar and dunk some fresh Ohio apples in it.

Oh yeah, I'm talkin' about boilin' down that sugar til it's golden, stirring for what seems like hours, watchin' the red line in the candy thermometer slowly crawl up to the magic number.

HOMEMADE CARAMEL APPLES, BABY!

This isn't my recipe.  It comes from Cooking Light Magazine. I'm a big fan of Cooking Light. I particularly like to buy the books they publish at the end of the year with the whole year's worth of recipes and NO ADS. Each one has an index so you can search by type of food or ingredient.

A link to the recipe is here.

Here's what you need to know about this recipe that is not mentioned in the instructions.

Use a good heavy-bottom or anodized aluminum pan, something that conducts heat well and evenly. Sugar and cream can burn or over flow easily. The heavy pan will help you manage the process. But importantly, DON'T WALK AWAY FROM THIS while it's boiling.

If you are not an experienced candy-maker--and I am not--you'll need every ounce of patience you can muster. Once the sugar and cream mixture gets to a certain temperature, the rise in temperature slows down considerably. What the recipe says takes about 45 minutes actually took more than an hour. And at some point you might be saying to yourself, "For cryin' out loud this is never going to get to 235 degrees!"

But it will, it will. You just have to be patient. Don't turn up the heat to try to speed up the process. My electric burner was only on "3" at the end boiling stage, maintaining a good rolling boil, requiring moderate stirring, not boiling over, but eventually reaching that thick consistency we all know an love.

Then as soon as it reached 235 degrees Fahrenheit, I transferred it to my old aluminum double boiler because it's narrow and deep and it worked great for dipping the apples.

The recipe said it would do 16 small apples. It did 10 medium size apples.

I chopped up peanuts, chocolate chips and butterscotch chips to dip them in. I dipped some in one topping, and I dipped a few in all three toppings. Of course the fatty toppings make up for the fact that it's a low fat Cooking Light recipe. As I think I've mentioned, I live to eat!

I'm falling down drunk at the following parties:

Debbiedoo's Newbie Party
Ironstone Nest Transformation Tuesday
Our Delightful Home Show Me What You Got
Skip to My Lou Made by You Monday
The Dedicated House Make it Pretty Monday

Saturday, October 6, 2012

Success at the Rural Society Antique Show

Now what will this crazy thrifty crafter do with this banged-up setee?
I'm thinking RED.
Any thoughts?
Stay tuned.

Friday, September 28, 2012

An endless summer and homemade granola recipe

So, I really wasn't ready for summer to end. I'm still gazing longingly at pictures I took over the summer, still wearing my Keens, still have my summer dresses out, even though it's clearly too cold for them.

These are the things I am missing most:

The rush of adrenaline when the frigid waters of the north Atlantic hit my chest as I plunge into a wave on a sunny afternoon . . .

Watching my dog, happily off-leash, leading the way down a sunny path alongside blackberry brambles and stone fences . . .

The smells and tastes of a meal prepared in the company of loving friends.

And last, but certainly not least, MABEL'S HOMEMADE GRANOLA!

Diane made homemade granola at the restaurant and whenever the new bananas came in, I'd fix myself a bowl of yogurt with a big helping of homemade granola, topped with fresh slices of banana.

Ahhhhh, HOMEMADE GRANOLA!! Crunchy, fruity, with good grains and nuts, some sweetness, some cinnamon.

Now even though I lost weight this summer, I can't credit the homemade granola for that, because, as Diane says, there's nothing really lowfat about Mabel's homemade granola.

There are lots of ways to make granola, lots of different ingredients you can include, depending on your tastes. Mabel's granola has almonds, bran cereal and honey. I started experimenting with  making my own, using what ingredients I have on hand at my house. Here's what I came up with.

3 to 4 cups of rolled oats
2 cups chopped walnuts (good fat)
1/4 cup flax seed (good fat)
1/3 cup wheat germ
1/4 cup packed brown sugar
1/4 cup blue agave nectar (you can use honey if you prefer)
1 stick of unsalted butter, melted (bad fat, but trust me, your granola will suck without it)
1 tsp ground cinnamon
1/2 tsp. salt (because anything sweet needs salt)

Combine all of these ingredients in a big bowl and toss them well.

Some of these measurements are approximate. You need to taste your granola before you put it in the oven. Is it sweet enough for you? Maybe start with less sugar if you don't like it sweet. As my friend Jim said when he watched me make this, "I see," he said, "you just want oatmeal cookies for breakfast." Duh.

Spread the mixture across several cookie sheets. You don't want it piled too high because you want it all to be exposed to the heat.

Put it in a 350 degree oven and set the timer for 5 minutes. After five minutes, stir it up. You'll be stirring it up every two minutes after that. VERY IMPORTANT: After the first five minutes, just KEEP AN EYE ON IT. Because there's butter on it, it's like a cookie, IT CAN OVERCOOK AND BURN VERY QUICKLY! So keep an eye out, and the minute it starts to get a little brown around the edges after a couple turns, it's done.

Take it out, let it cool a minute or two, then toss in some dried fruit. I used both golden raisins and dark raisins. You can use dried cranberries, banana chips, dates, whatever.

You can see that there is only a slight color difference between the uncooked granola and the cooked granola. I don't like to completely toast it because then it's too crunchy. You want it to have a little of that toasted flavor but still have some moisture in the grains.

This is the way I like it for breakfast or even a late night snack. A bowl of vanilla yogurt, homemade granola, topped with fresh banana, and a side of homemade zucchini bread slathered with--you guessed it--butter!

YUM!


I'm partying with some sassy bloggers at:

The Shabby Nest Frugal Friday
My Repurposed Life Catch As Catch Can
504 Main Tickled Pink
Days of Chalk and Chocolate Friday Linky Party
Full Circle Creations All Star Block Party
Debbiedoo's Newbie Party
Ironstone Nest Tuesday Transformation
Our Delightful Home Show Me What You Got
Skip to My Lou Made By You Monday


Monday, September 17, 2012

Eat to live, don't live to eat!

I spent a good part of my summer with my dear friends Donn and Diane, who run a restaurant called Mabel's on Block Island. Diane said they could use a hand in the restaurant Wednesday and Saturday mornings doing food prep, but I would have to be there by 6 a.m. Believe it or not, my customarily up-at-7-or-8-am-ass said, "Okay!"

View of Old Harbor, Block Island from Mabel's patio. Tough gig, huh.
BONUS: Driving in to town before most vacationers were even out of bed as the sun was rising over Old Harbor, sipping tea and puttsing (yes, I said "puttsing") around the kitchen before all the crazies want breakfast is a pretty sweet way to start any day in paradise.

My standard duties on Wednesdays and Saturdays were to make a frittata of  my choice, prep fruit for fruit salad, then "sugar" the donuts, which meant to take the fresh donuts (READ: FRESH DONUTS!!!!), after they had come out of the fryer, and dip them in one of three sugars: cinnamon sugar, plain sugar, powdered sugar. Tough gig, huh.


One day, I told Diane I wanted to make lobster quiche for the restaurant. After studying countless recipes for lobster quiche, I decided this quiche would be a lobster and crab quiche with corn and fresh basil.

My recipe is based on several that I looked at, but most of them tried to take the fat out of the recipe. Yikes! A real French quiche has heavy cream, people! It is not made with SKIM FRIGGIN' MILK! Okay, well maybe half-n-half instead of heavy cream cuz that's what the restaurant has in abundance on hand.

The real lump crab meat definitely takes this recipe up a notch. Rich yet delicate, with a little sweetness from the corn, big flavor from the fresh basil, you will want to eat half the pie! I guarantee it!

We made six quiches for the restaurant so I tried to break down the recipe to show what you need for just one quiche.

Lobster and Crab Quiche

  • 1 cup cooked lobster meat, pulled apart and shredded
  • 1/3 to 1/2 cup cooked real lump crab meat, pulled apart
  • fresh corn cut off one cob (when it's summer you have no excuse for not using fresh)
  • 1/2 sweet onion, chopped and sauteed (you could use leeks or shallots if you haven't spent your wad on lobster and crab meat)
  • fresh basil leaves, roughly 7-10 large leaves, chiffonade
  • 4 large eggs
  • 1 cup of half-n-half
  • nutmeg (because anything with egg needs a hint of nutmeg)
  • salt
  • pepper
  • mild white cheddar cheese, shredded

First, MAKE A PIE CRUST. Don't be lazy. Don't buy one. It's not that hard. Don't argue with me, JUST DO IT!

Pre-bake the crust for 10 minutes and then let it cool I can't tell you what a difference it makes to pre-bake and cool a crust for quiche. It will make the crust of your quiche light, flaky and delicate, even though it will be soaking in creamy eggs for a time before the quiche gets cooked through.

Toss together in a large bowl the lobster and crab meat, sauteed onion, fresh corn, and basil. Sprinkle with nutmeg, salt and pepper to taste. Dump the mixture into the pie crust.

I am estimating 4 large eggs, but it will depend on how big your pie pan is and how tall you build up the sides of your crust. It might take 5 eggs. So if you dump your egg mixture in and it is not completely full, crack another egg, help it along with some half-n-half, and keep filling up that pie crust til it's brimming.

Sprinkle with shredded cheese all over the top. A little more nutmeg wouldn't hurt either.

Bake at 350 degrees F until it is golden brown on the top and it stops "jiggling." It will take some time. Probably 50 minutes. I don't walk away from things cooking in the oven. I prefer this method over using timers. But if you insist on using a timer, set it for 45 minutes and then start checking. It will probably take less time in a convection oven.

We served it with a couple slices of watermelon and one of Diane's famous muffins.

Chef's note: You can seduce a fisherman with this quiche.

I'm mixin' margaritas at the following fiestas:

Our Delightful Home Show Me What You Got Tuesday
Boogie Board Cotttage Masterpiece Monday
Debbiedoo's Newbie Linky Party
The Ironstone Nest Transformation Tuesday
Made in a Day Made U Look Linky


Tuesday, September 11, 2012

Alot to be grateful for

You know how at the beginning of the school year teachers often ask students to write about what they did over the summer?

Well, I could write a dissertation about my summer and how fabulous it has been. I could write extensively about reconnecting with old friends, about how I learned new ways of eating fish and how I explored parts of Block Island I hadn't known before, even though I lived there for several years.

I could write all that, but the fact is, I just got home, my house is a total wreck inside and out from being away for an extended period of time, and I have guests coming to spend the night in less than two weeks!

So for now, here's a list and a few choice pics of the things I did on my summer vacation.

Sunset beach party with the Gutierrez family.
Reconnect with old friends.

Eat fish that was caught the same day and cooked over an open fire.

Realize that my dog, Daisy, is probably the best dog ever in the history of dogs.

Camp in the Adirondacks and the Poconos.

Eat sashimi tuna caught that morning.

Crescent Beach, Block Island, RI, where I spent a good amount of my time.
Dance . . . on the beach!

Swim in the ocean.


That would be me on a paddleboard.
Relax.
 
Walk the beach.

Hike nature trails.
 
Kayak.
 
Paddleboard.

Sing.

Play piano.

Meet new people.

Make new jewelry.
Morning view of Lake Eaton from my campsite in the Adirondacks.
Swim in freshwater ponds and lakes.

Cook and bake.
 

Lobster, crab, corn and fresh basil quiche--recipe will be in separate post.
Eat homegrown tomatoes.

Buy new dresses.

Eat lots of ice cream.

I am a grateful girl!


Thursday, August 9, 2012

Any Press Is Good Press

I may be basking in the sun on the beach, but I'm also basking in the limelight.

By day I'm mild-mannered but crazy blogger, Peggy M. who is crafting and re-decorating her way through life. By night, I'm Maggie Mae, crazy jewelry-maker who is starting to let go of a few pieces by selling them to unwitting consumers who are crazy enough to like her designs.

Check out the link below to the local rag on Block Island. It's a little article about yours truly selling a few baubles at the local farmers' market (wait . . . is that old-lady-under-arm-fat?! Makeup!)